Showing posts with label party. Show all posts

Monday, November 5, 2012

Recipe: White Sangria

I obviously have never thrown a baptism reception before, but I knew what I wanted it to look like. Pink & white; fresh, crisp and clean; more luncheon and less backyard bbq. Somehow With the help of my best friend, I was able to achieve exactly what I was going for. It was feminine but adult, minimal but not haphazard. And the best part was that everything was done when we left for the church, so all I had to do was pull things out of the fridge and the party was set.

I will never not take off the Friday before I host a party, Amen?

I'm going to break the reception down into several posts because there were several good recipes, but here's the first (and arguably the most important):

Strawberry Lemon White Wine Sangria
(you could probably just call it "white sangria")

Ingredients

  • 2 lemons, thinly sliced
  • 2 apples, cored and thinly sliced
  • 1 cup strawberries, tops cut off and quartered
  • 1 750 mL bottle Sauvignon Blanc (or other white wine)
  • 1/2 cup Bacardi (or other white rum)
  • 4 cups Sprite (or other lemon-lime soda)

Directions

  1. Add fruit to pitcher
  2. Pour wine and rum over top of fruit
  3. Cover and refrigerate overnight or longer (I made it Friday night and served it Sunday morning)
  4. Add soda immediately before serving

So refreshing! Even though it was October, it was still delicious. And it wasn't too strong! This would be great for a girl baby shower or wedding shower, and you could customize the fruit to your theme (blueberries and lemon for a boy baby shower, etc).

Photo credit: Alina Patel

Friday, June 15, 2012

Recipe: Award-Winning Oreo Cake

Yes, Award-Winning. I won an award for something I baked. Actually, I won three awards: #1 Taste, #1 Presentation and Grand Prize. I never thought I'd see the day - I am not a good baker in any sense of the word, so you can assume this recipe is somewhat easy and somewhat fool proof. A coworker hosted a bake-off in honor of his birthday (what a great idea, right?!) and this was something that I've had pinned for awhile, so here it is. I was rewarded with coworkers' compliments, Target gift cards and trophies that currently proudly adorn my desk.


My adorable trophies
And a lovely view of Cody. You're welcome

I know this goes without saying, but Pinterest directed me toward the original site.

Ingredients

  • 1 box devil's food cake
  • 4 squares Baker's semisweet chocolate
  • 1/4 cup butter
  • 8 oz cream cheese, softened
  • 1/2 cup sugar
  • 2 cups cool whip, thawed
  • 12 oreo cookies, crushed

Now you know why I won best presentation
Directions

  1. Preheat oven to 350 degrees
  2. Prepare cake batter as directed on box and bake in 2 round pans
  3. Let cakes cool for 10 minutes in pans, 1 hour on wire cooling rack
    (or longer if you're 9 months pregnant and can't get your lazy ass off the couch)
  4. Microwave chocolate and butter for 2 minutes or until butter is completely melted
  5. Stir mixture until chocolate is completely melted
  6. Beat cream cheese and sugar in a large bowl; fold in cool whip, then oreo cookies
  7. Layer: Cake, Cream Cheese Mixture, Cake, Chocolate Glaze Mixture
  8. Refrigerate until 10 minutes before serving

The best part is, if you're pregnant, you can lick the spoon of the chocolate glaze OR the cream cheese mixture. Who knew I'd miss raw cookie dough so much?!
Instagram makes everything look more delicious

Wednesday, March 21, 2012

Recipe: Skinny Cheese Fries

When I saw this on last night, I knew I had to have it. Right then and there. It was love and first sight (and at first bite!). The post was originally blogged by Gina at Skinny Taste but, as always, I made some modifications to our liking. The sky's the limit with cheese fries - you could serve them with ketchup or sour cream instead of ranch to dip, you can top them with green onions, white onions, jalapenos, or just cheese and bacon. You could put chili on them if you're feeling really saucy! But the best part about these is that they're baked with just a tiny bit of olive oil, not deep fried, which means they work out to be around 300 calories per serving. Amazing!

This recipe is for two servings (we had it for dinner!), but you could easily multiply it for a crowd.

Ingredients

  • 2 medium-to-large russet potatoes, washed
  • 2 tsp olive oil
  • 1 tsp paprika
  • 1/4 tsp chili powder
  • 1/4 tsp onion powder
  • 1/4 tsp garlic powder
  • 4 slices turkey bacon (only 25 calories each!)
  • 1/4 cup sharp shredded cheddar cheese
  • 1/8 cup shredded mozzarella cheese 
  • Optional: jarred jalapeno slices; 1/4 white onion, finely chopped

Directions 
  1. Preheat oven to 400 degrees
  2. Cover baking sheet with foil (for easy clean-up!) and spray lightly with cooking spray
  3. After washing your potatoes, slice them into 1/4 inch thick slices, then slice those into 1/4 inch strips
  4. In a medium bowl, coat potato strips in olive oil. Add spices, making sure to evenly coat the "fries" in oil and spices.
  5. Bake "fries" on lined cookie sheet for 20 minutes, flipping once half-way through
       
  6. While the fries are baking, cook and chop bacon. Prepare any other toppings you might like (ie: chop the onions or scallions)
     
  7. Once fries are done baking, I recommend broiling (on High) for a minute or two to make them a little bit crispier. You could flip to make sure both sides are getting broiled.
  8. Remove fries from baking pan into a small baking dish (I used an 8"x8" glass pan that worked fine but you could even do something smaller). Layer cheese, bacon and other toppings over each thin layer of fries to make sure they're all covered and smothered!
     
  9. Place topped fries back in the oven to broil (on High) for a few minutes. Broilers are tricky, so you'll need to check every minute or so and pull out as soon as the cheese starts bubbling.
  10. Serve with your choice of fat-free ranch or fat-free sour cream.
    I put jalapenos on my half and onions on B's half
    Because I'm sweet like that.


Monday, February 13, 2012

Recipe: Cheater's Potato Skins

Can you tell I've been lazy lately? Not in the all-I-want-to-do-is-sleep, I'm-too-tired-to-think, someone-please-order-me-a-pizza way (OK, there have been a few of those nights), but more in the I-need-home-cooked-food-but-couldn't-possibly-stand-in-the-kitchen-for-an-hour way. Do you follow?


So, Super Bowl Sunday. I love potato skins, but have you ever tried to make them? They are so hard! I always end up slicing too much off and getting mangled skins, or ending up with really really thick ones, and it's just not worth the effort to me. PROBLEM SOLVED!


So the woman who originally posted the recipe calls them potato rounds, but they're pretty much cheater's 'tater skins to me. And they're really, really yummy. A couple tips:


  • You could cook potatoes this way without all the cheese and bacon, and have a yummy side dish for dinner
  • You should definitely start growing your own green onions. I have, and it's amazing how fast they grow. Next time you buy them, just save the white bulb and put it into a small glass of water in your window sill. You'll have growth in days, and a constant supply of green onions. Ah, nature!
Ingredients
  • 4 large baking potatoes
  • 1/4 cup melted butter
  • Salt and pepper to taste
  • 5 cloves minced garlic
  • 8 slices bacon, cooked and crumbled
  • 8 ounces shredded Cheddar cheese
  • 1/2 cup chopped green onions
  • Sour cream
Directions

  1. Preheat oven to 400 degrees
  2. Line cookie sheet(s) with aluminum foil - trust me on this one
  3. Cut potatoes into 1/2 slices
  4. Mix garlic, salt & pepper with melted butter
  5. Brush both sides of each potato slice with butter mixture
  6. Bake 30 minutes, turning once in the middle (make sure the potatoes don't start to brown too much)
  7. Remove from oven, top with bacon, green onion and cheese
  8. Bake for another 10 minutes or until cheese is melted and bubbly
  9. Serve with a side of sour cream for dipping


Monday, February 6, 2012

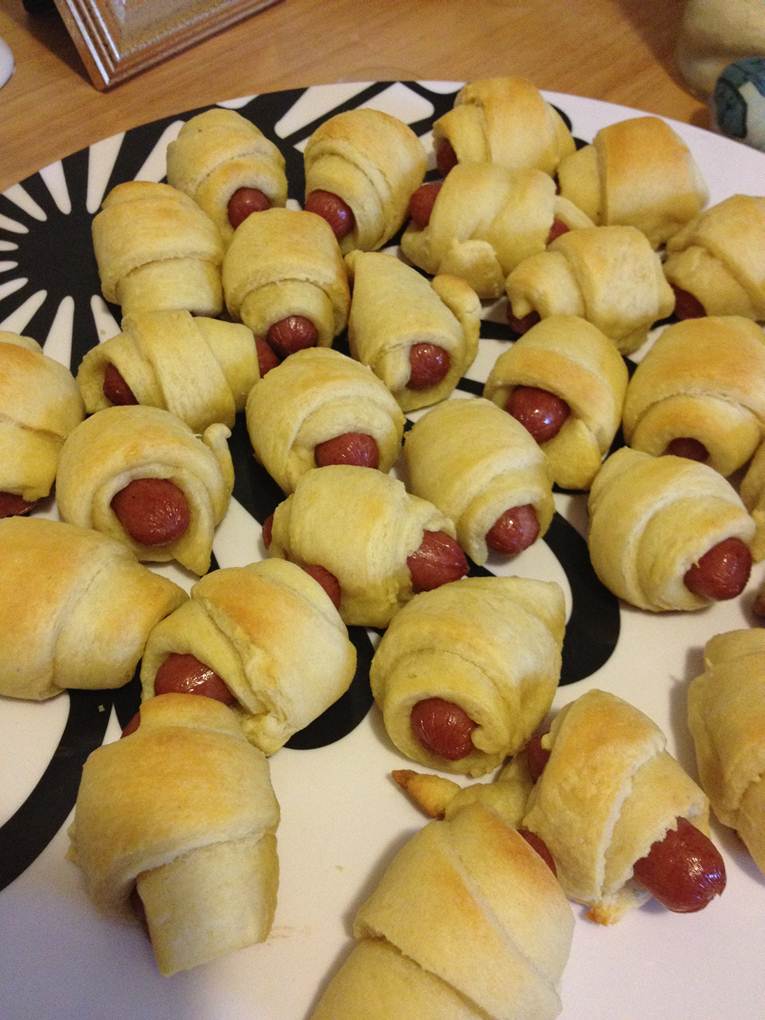
Recipe: Pigs in a Blanket

This is just silly. But I'm posting it all the same because I am so behind on my recipe posts and because the Super Bowl was yesterday and, let's be honest, you can't have a super bowl party without pigs in a blanket. Have you ever bought them frozen from the store? Because I have, and those suckers are expensive. Why?! I don't get it! It's pastry & hot dog. Anyway, make your own, because they're cheap and because, really, who doesn't love pigs in a blanket?

Disclaimer: I only had one, since I'm not really supposed to have processed meat or whatever. Stupid pregnancy.

Ingredients

  • 2 cans crescent rolls
  • 1 pkg cocktail wieners 

Directions


  1. Preheat oven to 375 F - just follow the directions on the can of crescent rolls
  2. Grease a cookie sheet with cooking spray - or, for easy clean-up, line with foil then spray
  3. Roll out pre-cut crescents and cut length-wise so each can makes 16 half-crescents
  4. Don't cut them width-wise or else your blankets will look special, like this

    Don't worry, Ben ate the special ones
  5. Wrap, starting with the wide end, one hot dog in each half-crescent
  6. Line on cookie sheet, like a cute little army of pigs in blankets
  7. Bake for 11 minutes or until golden brown
  8. Serve warm (duh) with ketchup and/or mustard

Tuesday, January 3, 2012

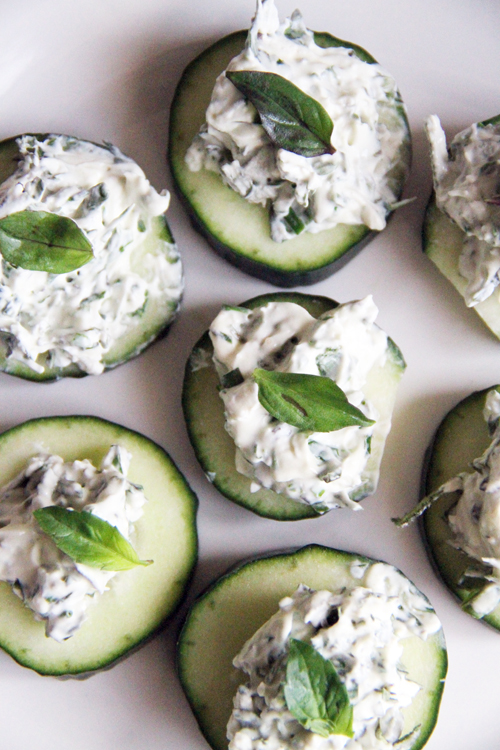
Recipe: Cucumbers with Cream Cheese

Ah ha! A post where I DON'T talk about the baby. How does that make you feel, readers?

Well, I can hardly call this a recipe. Also, I forgot to take a picture, so I'm stealing the inspiration picture from Alisa Burke, by way of Pinterest.

Mine didn't exactly look like that, but they were adorably displayed on my favorite Crate & Barrel platter (a wedding gift from my friend Aubrey) and they were delicious ... even for Baby Bacon, who was not really tolerating veggies at the time. I made them for my Girly Christmas Party and they were a hit!

Ingredients

  • 2 Cucumbers
  • 1 8oz pkg of Neufchatel Cheese (low-fat cream cheese)
  • Basil, Sage, Oregano, Chives - or any combination thereof!
  • Dried Dill Weed


Directions
Optional: Peel cucumbers in an alternating pattern like the above - this basically just means you peel a strip all the way down, then leave equal amount of green, then peel another strip, and so on. It's so simple and makes it look pretty!

  1. Slice cucumbers into thick slices
  2. Heat cream cheese in microwave to soften
  3. Mix in a variety of herbs to your liking
  4. Scoop dollop of herbed cream cheese onto each cucumber slice
  5. Top with one shake of dill weed

I should mention here that you can (should) refrigerate them right up until the point of serving. Nobody likes a room temperature cuke!

Great party appetizer - bite-size, finger foods, no mess and they're healthy!

Tuesday, August 23, 2011

My first baby shower

(I should note here that this is my first time co-hosting a baby shower, not having one thrown for me. don't get ahead of yourselves, people)

Way back in February, Grace told me she was 10 weeks pregnant. That exact day, we began planning her baby shower. There were excited whispers and emails among our tiny supper club of "we're going to have a baby!" (which Grace loved, by the way, and often responded with "are YOU going to push it out of YOUR vagina?!"). There were tears when she walked off the elevator one spring day with a pink dress on (yes, she color-coded her wardrobe on the day they found out the baby's sex). There have been multiple planning lunches to discuss the finer details of this shower.

And then it was finally here.

We thought we were prepared. We had shopped, spent, crafted, cut, baked, printed and invited. We had activities and games planned, a menu set, decorations made. And somehow we STILL were running around like chickens with our heads cut off the day of. 

Chickens who had frilly pink bathing suits to hang and green whimsical birds to cut out and cakes to ice and punch to make. 

Chickens who had so much fun planning a special day for such a sweet sweet mommy-to-be.
The co-hosts started out just me and Melati. Then sweet Sloan volunteered her house for the event, and she was usurped into our planning committee - and thank goodness she was! She made (MADE?!) these amazing cupcakes and the cake.


We really did have a lovely time planning and executing the shower, and were so excited to see 20 beautiful guests arrive to celebrate Grace and Baby Tarrant.


Beyond the amazing cake & cupcakes, some of my favorite touches included...

two punch varieties I made: "Knocked Up" (non-alcoholic) and "Knocked Out"  (alcoholic). Delicious and adorable!


... Creating an alphabet book for the baby, with each guest coloring a letter

... Utilizing Sloan's boys' easel to welcome and greet the guests


...  "Baby Bingo" to engage the guests while Grace opened all her adorable miniature gifts for Baby T. Lisa won a fabulous hot pink clutch, if I do say so myself ;)


Be on the lookout for a recipe post soon to surround the punches, veggie pizza, fruit tarts and other highlights from the menu. Also, happy to share any of my templates for decorations, signs, games, etc. 

And I'd be remiss if I didn't mention the gorgeous invitations, designed by Emily Forsberg (seen above on far left). She's a rockstar!

Friday, May 6, 2011

Kelly Getting Married

My best friend from high school, Kelly Michele Urso Soon-To-Be-Cloyd is getting married soon. 15 days to be exact. She got engaged only 6 months ago (while I was in Italy, which resulted in a full blown freak-out in the middle of a street in downtown Florence ... I'm the reason they call us Stupid Americans), so we have crammed quite a lot of celebrating into a very short amount of time, the most important of which was the bachelorette party. So, last Friday, I hopped on the megabus and headed to Charlotte for a wknd of debutantes and debauchery. We began the weekend with a "PJs & Pearls" Sleepover, which I co-hosted in the form of providing drinks and decorations.

Decorations included the newly famous tissue paper pom-poms, in hot pink and white glitter and an adorable banner I made in Microsoft Publisher (let me know if you want the template).

The drink menu included 4 movie-themed cocktails, complete with modified movie posters to incorporate the recipe & Kelly's name, fiance and wedding date. Again, let me know if you'd like me to send you the files. I think it was a toss-up for the favorite cocktail, but here they are ... all are delicious!

  • Pretty in Pink Lemonade
    Serving: Pitcher
    12 oz frozen pink lemonade concentrate, 12 oz light beer, 3/4 cup vodka
  • Breakfast at Tiffany's Blue Martini
    Serving: Glass
    2 parts vodka, 1 part blue curacao, 1 part pineapple juice
    (may need to supplement the pineapple juice a bit, these were strong!)
  • Carrie's Cosmopolitan
    Serving: glass
    1.5 oz vodka, 1 oz triple sec, 1/2 oz lime juice, 1/4 oz cranberry juice
  • I Carried a Watermelon Martini
    Serving: Glass
    1 shot vodka, 3 shot cranberry juice, 1 part 7-Up

Saturday included a lingerie shower and brunch at Abby's beautiful home. I won't steal all her glory, but let me just say that she is a FANTASTIC hostess, and I certainly hope she shares some of the beautiful ideas & recipes on her blog. Something about mini egg fritatas, spinach stratta, things I've never heard of that were SO GOOD!

Stuffed and stomachs hurting from our giggles, we headed downtown to get situated in our hotel rooms and primp, then had a delicious dinner at Dandelion Market. YUM! The rest of the night gets a little hazy for most of us, and everyone knows secrets from a bachelorette party can't be shared, but I think it's safe to say Kelly's last big night of "singlehood" sent her out with a bang. CONGRATULATIONS KELLY!!